
Door Position Adjustment / Door Striker Adjustment
14-7prose procedureAfter installing the door, check for a flush fit with the body, then check for equal gap between the front and rear, and top and bottom door edges and the body. The door and body edges should also be parallel. Adjust at the hinges as shown.
CAUTION
Place a shop towel on the jack to prevent damage to the door when the hinge bolts are loosened for adjustment.
| Specification | Value |
|---|---|
| Hinge mounting bolts | Loosen the bolts, and move the door BACKWARD or FORWARD, UP or DOWN as necessary to equalize the gaps. |
| Door mounting bolts | Loosen the bolts slightly to move the door IN or OUT until flush with the body. If necessary, you can install a shim behind one hinge to make the door edges PARALLEL with the body. |
Hinge mounting bolts
Loosen the bolts, and move the door BACKWARD or FORWARD, UP or DOWN as necessary to equalize the gaps.
Door mounting bolts
Loosen the bolts slightly to move the door IN or OUT until flush with the body. If necessary, you can install a shim behind one hinge to make the door edges PARALLEL with the body.
Door Striker Adjustment
Make sure the door latches securely without slamming. If it needs adjustment:
- 1Draw a line around the striker plate for reference.
- 2Loosen the striker screws, and move the striker IN or OUT to make the latch fit tighter or looser. Move the striker UP or DOWN to align it with the latch opening. Then lightly tighten the screws and recheck.Hold the outside handle out and push the door against the body to be sure the striker allows a flush fit.
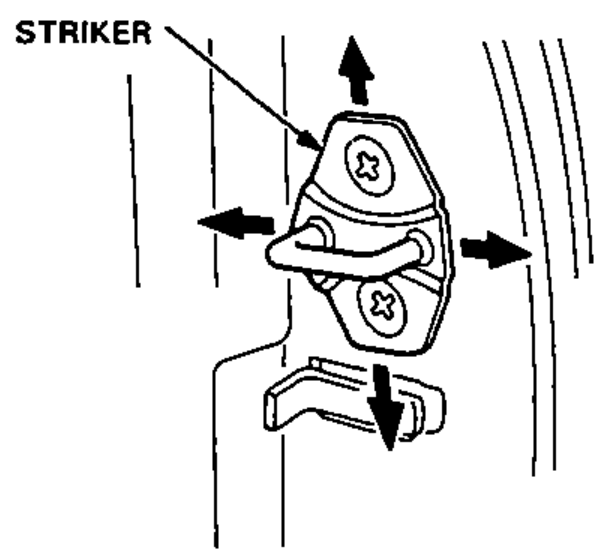
- 3If the door latches properly, tighten the screws and recheck.